I’ve really been trying to come up with an easy DIY that even the most un-crafty, un-creative person or just a beginning crafter could do. This actually left me quite puzzled at first, but then it hit me! Cards! I mean come on, we’ve all made at least one homemade card in our lifetime. So here’s what I came up with…
I decided to create a semi-homemade card tutorial. Semi-homemade meaning, you can take the templates that I have so lovingly created* and put your own spin on them during assembly. Basically, you can make the cards as complex or as simple as you’d like. Let’s get started.
What you’ll need:
– Some sort of adhesive tape or glue
– Scissors
– Blanks cards
(Can be purchased at craft stores)
– Card templates
(Attached at the end of this post, I printed onto white card stock)
– Complimentary paper of your choice
– Ruler
– Pen/pencil
Step 1
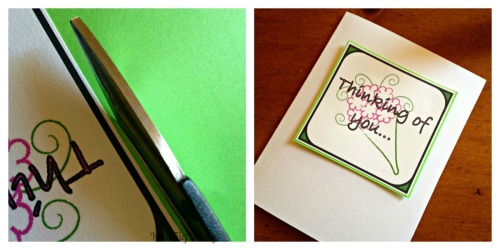
Cut out designs on the card templates.
Side note 1: Whenever I’m crafting I always cut a little bit over around the actual border. This takes off the pressure of having to cut the border line perfectly. Andddd in the end I just think it looks better presentation wise.
Side note 2: I don’t use a ruler to trace where I’m actually going to cut. I just eye-ball it as I’m cutting. The rule usually goes measure twice and cut once but when I’m paper crafting I skip the measuring and cut twice. I just continue cutting down until all the sides look about even. If you’d feel more comfortable tracing with a ruler before cutting then go for it! They’re going to be your creations after all.
Step 2
Once all the designs are cut out start placing them on the different colored complimentary papers. I just used some card stock I had at home for my background paper but you can use whatever type and colors of paper you’d like. Keep playing around with the placement of the designs on different backgrounds until you find what you think looks the best. There is no real right and wrong way to do this.
Step 3
Get together everything you’ll need for the first card.
Step 4
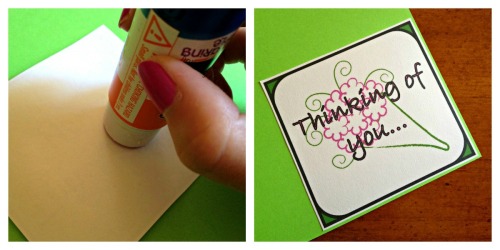
Take the design for your first card and glue (or tape) the back then place onto the background paper of your choice.
Step 5
Cut out the design (still not using a ruler!) then play around with the placement onto the blank card. Again, there’s no right or wrong way to do this. I placed mine in the middle of my card.
Step 6
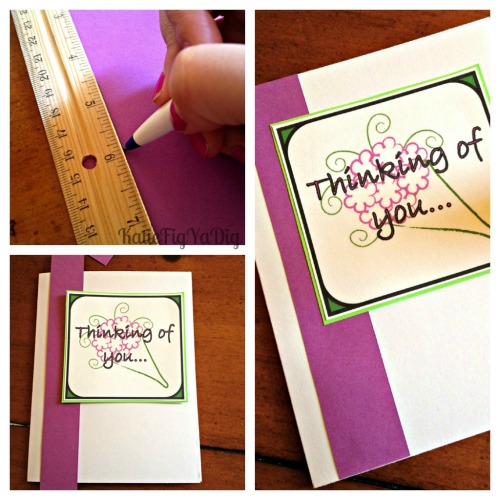
After placing my design in the center I thought the card looked a little bare for my liking so I decided to add an accent. I used a ruler this time to trace out a stripe on a piece of the complimentary paper I already had out. For this stripe I just traced both sides of the ruler to ensure the entire thing would have an even width. After tracing, I cut it out and then played around with placement again. Once it was in a placement I liked, I glued the design and accent stripe into place then cut off the end of the stripe to fit the card.
And basically you’re done. You just need to repeat those steps with the different designs you like from the templates or your own designs. Remember to try and change it up a little bit with every card. Have some cards going vertical and some horizontal. My favorite part is adding the accents. Adding different accents really changes the look of your card making it your own and truly semi-homemade.
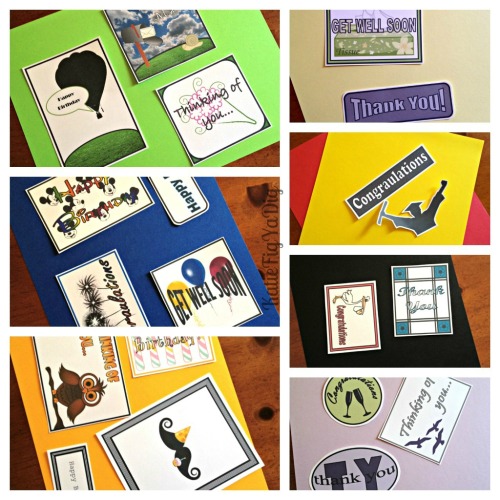
Here’s what I came up using only the materials I listed above and my imagination.
Some are simple and some are complex. I wanted to create a variety so that you could get an idea of what is possible with the somewhat plain designs you’ll print out.
Here are the templates:
Birthday – Color
Birthday – BW
Get Well Soon and Thinking of You – color
Get Well Soon and Thinking of You – BW
Congrats and Thank You – Color
Congrats and Thank You – BW
Give my tutorial a try? Leave a comment. I’d love to hear whether or not it worked out for you and what you came up with.
– Katie
*Although I did create the card templates I am in no way claiming that the pictures used are my own. All pictures were found using Google Images.


Love this and it comes at a great time since I want to make my mom a birthday card. Thanks for the great tutorial. Stop by and say hi 🙂
Awww, I’m glad you liked it! I included a black and white version that way you can either change the colors in Word or you can color them in once you print it. Just in case you weren’t fond of the colors I made the templates in 🙂
Awww. I tried opening both types of template files, but my computer messes with the layouts. I don’t have .docx. If you get a chance some day, can you convert and upload them with a standard .doc file ending?
I am so sorry for getting back to you so late! I have been so swamped with school but I’ll try to figure out how to convert the files. Do you have an email you’d like me to send the files to if I’m successful in converting?
Katie
I’ve been there before, so I understand completely. It’s around finals week now, if I recall, and that’s one of the worst times besides “dead week” and just before any sort of break.
I convert files by doing a “save as”, then changing the file type. If it doesn’t have the option I want, I can often doing it by using the “export” function, which is mostly for PDFs and .jpgs in some programmes.
If you’d like to email them, the best one to send it to is gconyers AT insanitek DOT net. (Hopefully spambots don’t pick that up…) I’d appreciate it since your graphics are adorable, and my skills aren’t that good for making them. =D
Thank you for being understanding! My school is on trimesters so we’ve still got a week and a half left. I can’t wait to be on break so I have time to blog again, I miss it so much. I’m trying to change the documents now so if I’m able to I will email them to you!