Tag Archives: craft

Five Semi-Homemade Valentines

Hi everyone! While I get my January favorites ready I just wanted to put up a quick and easy Valentine’s Day tutorial. The template used for all the valentines can be found here –> Valentines Day Templates. Print that out on the paper of your choice (I used white cardstock) and let’s get started!

Semi-homemade Valentines Blog post

Popcorn Valentine

What you’ll need:

– Template
– Scissors
– Microwaveable Popcorn
– Tape

Step 1:

Cut out popcorn pattern from the template.

Popcorn step 1

Step 2:

Tape pattern to the front of the popcorn package.

Popcorn step 2

Oreo Valentine

What you’ll need:

– Template
– Scissors
– Individual Oreo package
– Stapler

Step 1:

Cut out Oreo pattern from the template.

Oreo step 1

Step 2:

Staple pattern to the end of the Oreo package.

Oreo step 2

Hershey Kiss Valentine

What you’ll need:

– Template
– Scissors
– Snack size bag
– Hershey Kisses
– Stapler

Step 1:

Place a handful of Hershey Kisses inside a snack size bag then seal.

Hershey kiss step 1

Step 2:

Cut out Hershey Kiss pattern from the template.

Hershey Kiss step 2

Step 3:

Staple pattern to the top of the snack size bag.

Hershey kiss step 3

Cup Valentine

What you’ll need:

– Template
– Scissors
– Cup
– Hole Punch
– String/ribbon

Step 1:

Cut out cup pattern from the template.

Cup step 1

Step 2:

Punch a single hole at the top of the pattern.

Cup step 2

Step 3:

Tie pattern tightly around the top of the cup.

Cup step 3

Pencil/Pen Valentine

What you’ll need:

– Template
– Scissors
– Pencil or pen
– Hole punch

Step 1:

Cut out writing utensil pattern from the template.

Step 2:

Punch holes in both side of the heart pattern.  Next, Slide pencil/pen through the holes.

Make sure the holes are big enough for your pencil/pen to fit through. (for this valentine I used a three hole punch because it creates bigger holes)

Pencil step 2

And there you have it… very affordable, cute and most importantly EASY homemade Valentines that are sure to impress your child’s classmates. Happy (almost) Valentine’s Day everyone!

Semi-homemade Valentines

Give my tutorial a try? Leave a comment. I’d love to hear whether or not it worked out for you.

– Katie

**BONUS**

Here’s how I will be packaging my Valentines.

What you’ll need:

– White paper bag
– Stapler
– Craft tape

Packaging

2 Comments

Filed under DIY and Crafts

DIY: Last Minute Semi-Homemade Halloween Treats

What you’ll need:

– Templates I created:
Mummy Little Debbie Cake Cover
  Frankenstein Popcorn Cover Color
Frankenstein Popcorn Cover B&W
– Scissors
– Clear tape
– Double stick tape
– Little Debbie Fall Party Cake
– Popcorn (single serve mini bag)

Step 1

Print out templates.

Step 2

Cut out the mummy, Frankenstein and bolts.

Step 3

Place double stick tape onto the front of the popcorn and party cake packages.

Step 4 – Mummy

Place mummy template in the center of the party cake and lightly press down. Tape one side down then tape the other. Make sure the template is tightly wrapped around the party cake to ensure it will stay in place.

Step 4 – Frankenstein

Place Frankenstein template in the center of the popcorn and lightly press down. Tape one side down then tape the other. Make sure the template is tightly wrapped around the popcorn to ensure it will stay in place.

Next, place a small piece of double stick tape on the bolts then place onto the sides of the Frankenstein face by the stitches.

And viola, you’re done!

I made these cute treats to give to the kids I nanny and decided to make a quick tutorial out of it. Enjoy!

– Katie

Leave a comment

Filed under DIY and Crafts

DIY: Custom Crayons

What you’ll need:

– Razor or Exacto knife

– Knife

– Cutting board
(you may want to use a cutting board or other solid
surface you don’t mind ruining)

– Cookie Sheet

– Aluminum Foil

– Crayons

– Oven safe silicone mold(s)
(I got mine for 99 cents each from Ikea. Yes, only 99 cents!!!)

– Toothpicks

Step 1

Using a razor or Exacto knife carefully slice the crayon wrapper then remove. Repeat until the number of desired crayons is reached. I found it easiest to hold the crayon at the top (as shown in the top, right picture below) and slice the wrapper in one straight line.

*If you’re using a new pack of crayons the wrappers of certain colors will be a little trickier to remove. I’d suggest popping them into the freezer for about 15 minutes before you begin the unwrapping process. The slight freeze allows for easier removal.*

Step 2

Begin cutting the unwrapped crayons into small pieces. The pieces should be around ¼ of an inch or smaller. This will allow the pieces to fit into the forms small cracks.While cutting up the crayons I started off using one method but that was taking quite a bit of time so I switched to another. Listed below are both methods I used while cutting the crayons.

Method #1

Place a crayon onto the cutting board and hold as seen in the first photo below. Begin sawing at the crayon while applying pressure downwards. You should only need to saw a bit before it breaks into a small piece.

Method #2

Place a crayon onto the cutting board. Hold the knife as shown in the first picture below then apply pressure directly onto the index finger using your other hand (as shown in the second picture below). Be careful with your thumb placement during this method so it doesn’t get caught under the end of the knife.

I found this method more effective because it was the faster of the two.

Step 3

Once the desired amount of crayons have been cut, you can begin filling your silicone mold(s). This is the part where you let your creativity and imagination take hold. Play around with different patterns and color combinations to make each crayon unique. You’ll want to overfill the forms slightly so when the crayon pieces begin to melt it’s entirely filled with melted wax.

Step 4

Once desired amount of forms have been filled place the mold onto an aluminum foiled covered cookie sheet.

Step 5

Place cookie sheet into a 250 degree oven for 12-15 minutes. Time and temperature may vary slightly oven to oven.

*You basically just want to bake until all the crayon pieces have melted. I’d suggest checking the mold around the 10 minute mark and see how it’s doing.*

Step 6

Once all the crayon pieces have completely melted remove the cookie sheet from the oven. Using a toothpick pop any air bubbles you see on the surface of the melted wax.

*This step is kind of optional. If the air bubbles are not popped you just won’t have as smooth of a surface on the new crayons.*

Step 7

Carefully carry the silicone mold and place it into the freezer for 20 minutes. Try to avoid spilling the melted wax because obviously, it will burn if it gets onto your skin. After 20 minutes the new crayons should be completely hardened, as well as cool.

Step 8

After 20 minutes remove the mold from the freezer and set aside until it reaches room temperature. This step will help the new crayons release easier.

Step 9

Flex the mold back and forth a bit to loosen the new crayons. Once the crayons have been loosened, flip the mold over and start popping them out. You’ll want to do this with a careful hand so they don’t break when they’re released.

Repeat until all the crayons have been released and you’re done!

Since these crayons are so adorable and would make a great gift I decided to add on a quick and easy wrapping option.

What you’ll need:

– Small treat bags

– Ribbon

– Scissors

– Crayon

All you do is place a crayon into the small treat bag then tie off the top with a ribbon.

This craft is really inexpensive, easy, and I honestly had fun making them. I really hope you all will give it a shot. I also tested it out with the kids I nanny the next day, and they had a blast. Look for pictures from that day in August’s Nanny Bits post at the end of the month.

Give my tutorial a try? Leave a comment. I’d love to hear whether or not it worked out for you and what you came up with.

– Katie

Here are my casualties from the project: R.I.P. little fishes.

5 Comments

Filed under DIY and Crafts

DIY: 18 Semi-Homemade Cards (Step-By-Step Tutorial)

I’ve really been trying to come up with an easy DIY that even the most un-crafty, un-creative person or just a beginning crafter could do. This actually left me quite puzzled at first, but then it hit me! Cards! I mean come on, we’ve all made at least one homemade card in our lifetime. So here’s what I came up with…

I decided to create a semi-homemade card tutorial. Semi-homemade meaning, you can take the templates that I have so lovingly created* and put your own spin on them during assembly. Basically, you can make the cards as complex or as simple as you’d like. Let’s get started.

What you’ll need:

– Some sort of adhesive tape or glue
– Scissors
– Blanks cards
(Can be purchased at craft stores)
– Card templates
(Attached at the end of this post, I printed onto white card stock)
– Complimentary paper of your choice
– Ruler
– Pen/pencil

Step 1

Cut out designs on the card templates.

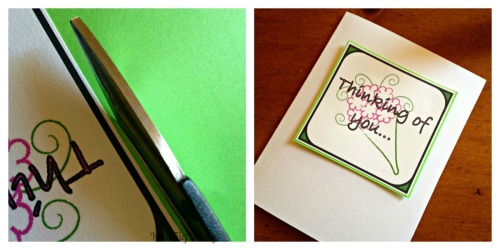
Side note 1: Whenever I’m crafting I always cut a little bit over around the actual border. This takes off the pressure of having to cut the border line perfectly. Andddd in the end I just think it looks better presentation wise.

Side note 2: I don’t use a ruler to trace where I’m actually going to cut. I just eye-ball it as I’m cutting. The rule usually goes measure twice and cut once but when I’m paper crafting I skip the measuring and cut twice. I just continue cutting down until all the sides look about even. If you’d feel more comfortable tracing with a ruler before cutting then go for it! They’re going to be your creations after all.

Step 2

Once all the designs are cut out start placing them on the different colored complimentary papers. I just used some card stock I had at home for my background paper but you can use whatever type and colors of paper you’d like. Keep playing around with the placement of the designs on different backgrounds until you find what you think looks the best. There is no real right and wrong way to do this.

Step 3

Get together everything you’ll need for the first card.

Step 4

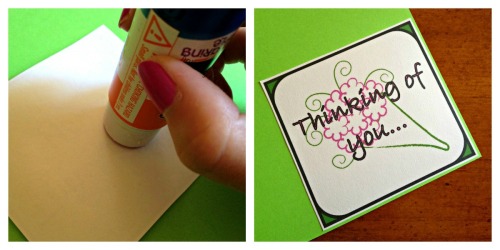
Take the design for your first card and glue (or tape) the back then place onto the background paper of your choice.

Step 5

Cut out the design (still not using a ruler!) then play around with the placement onto the blank card. Again, there’s no right or wrong way to do this. I placed mine in the middle of my card.

Step 6

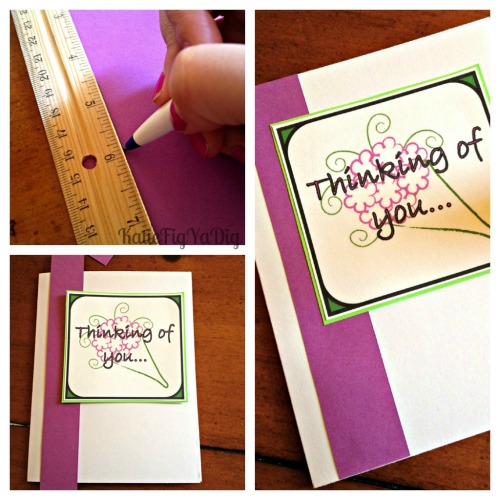
After placing my design in the center I thought the card looked a little bare for my liking so I decided to add an accent. I used a ruler this time to trace out a stripe on a piece of the complimentary paper I already had out. For this stripe I just traced both sides of the ruler to ensure the entire thing would have an even width. After tracing, I cut it out and then played around with placement again. Once it was in a placement I liked, I glued the design and accent stripe into place then cut off the end of the stripe to fit the card.

And basically you’re done. You just need to repeat those steps with the different designs you like from the templates or your own designs. Remember to try and change it up a little bit with every card. Have some cards going vertical and some horizontal. My favorite part is adding the accents. Adding different accents really changes the look of your card making it your own and truly semi-homemade.

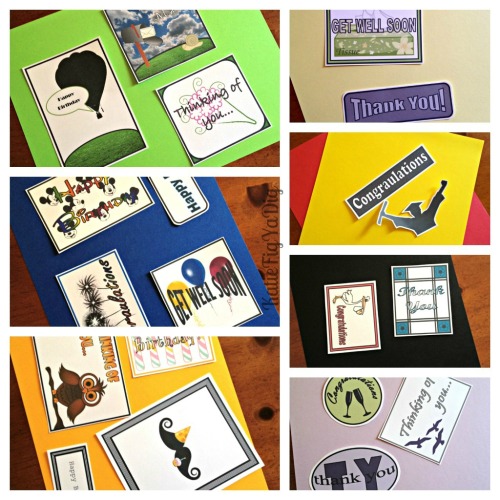
Here’s what I came up using only the materials I listed above and my imagination.

Some are simple and some are complex. I wanted to create a variety so that you could get an idea of what is possible with the somewhat plain designs you’ll print out.

Here are the templates:

Birthday – Color
Birthday – BW

Get Well Soon and Thinking of You – color
Get Well Soon and Thinking of You – BW

Congrats and Thank You – Color
Congrats and Thank You – BW

Give my tutorial a try? Leave a comment. I’d love to hear whether or not it worked out for you and what you came up with.

– Katie

*Although I did create the card templates I am in no way claiming that the pictures used are my own. All pictures were found using Google Images.

6 Comments

Filed under DIY and Crafts

DIY Corner Bookmark (Step-By-Step Instructions)

Since it’s officially my summer break I’m already starting on my summer to-do list. No procrastination here… for once! Number 2 on my list was to read. I have about 8 or so books that I had bought last summer to read which I never got around to and I also just bought another book. I started reading my most recent book purchase, “Thirteen Reasons Why” by Jay Asher on Saturday night and realized I didn’t have a bookmark. This is a major problem that I often find myself coming across. So much so that I have probably 3 or 4 books at home that I’ve already started but have no idea what place I’m at. Eventually I’ll just have to start over from the beginning.

Anyways… the reason I’m rambling on about this is that yesterday I decided to make my own bookmarks. A few months ago my mom had shown me some awesome page corner bookmarks in a magazine (I think) so I decided to create a template on Word and try to make my own. The trial was a success so I decided to share the finished product and do a tutorial on it.

Corner bookmarks are great because they don’t stick out or easily fall out of your book. They’re super easy and extremely inexpensive to make so I hope you’ll give it a try.

Here we go…

What you’ll need for this project:

1) Printer size cardstock (or other thick paper)
2) Bookmark Template
3) Paper scraps or other patterned paper
4) Scissors
5) Glue or tape (I recommend glue)
6) Pencil
7) Ruler
8) Eraser (that works well)

Step 1

The first thing I did was pick out the color cardstock I wanted then I went through my paper scraps and found patterns that matched the cardstock I have chosen.

Step 2

Print the bookmark template onto your cardstock then cut out the figures.

Take off the entire black line (without cutting off too much extra) from the square sides. The edges around the winged section don’t matter so the black lines can be showing. (pictured below)

Step 3

Keep cutting until all of the figures are cut out. You only need one of the separate little triangles so you can throw the others away. We’re going to use this for tracing purposes later on.

(Awesome shadow right…?)

Step 4

Next, using your pencil, ruler, scissors and patterned paper you’re going to make and cut out a square that will be for the bottom part of our bookmark. You want the square to be around 2 ¼ inches on each side (this will be smaller than the bottom but that’s the idea).

Step 5

Using the first square as a pattern trace as many squares as you’re making bookmarks then cut them all out. (It would work best if you trace on the back side of your paper because then you can skip step 6 all together. I wasn’t genius enough to think of this until step 7… whoops)

Step 6

Using your eraser (preferably one that works well) remove any pencil marks from the sides of the square pieces.

Step 7

Using the small separate triangle you cut out trace triangles onto your patterned paper. These will be for the top part of your bookmark. Again, trace as many triangles as you’re making bookmarks then cut out.

Step 8

Now that everything is cut out (you should have an equal number of bookmarks, squares and triangles) it’s time to assemble! For each bookmark you’ll need one square and one triangle.

(Awesome shadow again right…?)

Step 9

Take your bookmark and using the side with the black lines facing up you’re going to fold in both wings making a square.

Step 10

Put glue (or tape) on the back of one wing. Once glued place the other wing onto the glued wing and hold. Make sure you have a nice clean line at the edge (shown in the right-hand side picture). The paper may resist this but just hold it there for a minute. This lets the glue dry a bit and it will keep it in place.

Step 11

Glue the backside of your square then place all the way into the bottom inside corner of your bookmark.

Step 12

Glue the backside of your triangle then place onto the top outside of your bookmark.

Step 13

The top part of your bookmark may be bulging out a bit (from force gluing it into place) so just use your hands to press it flat.

Repeat steps 9 -13 for as many bookmarks as you desire and you’re done!

The only thing left to do is put it to use…

Got to go now… I have a book to read!

Give my tutorial a try? Leave a comment. I’d love to hear whether or not it worked out for you.

– Katie

P.S. If these bookmarks are too “Plain Jane” looking you can put a number of easy spins on them.

1) Make it into a monster eating your page.
2) Add eyes that are looking at your page.
(these two would be great for kids!)
3) If you’re a night reader like me you could also add on
the words, “you fell asleep here.”

7 Comments

Filed under DIY and Crafts

DIY Ombré T-Shirt (Step-By-Step Instructions)

Happy Friday everyone! We made it to another weekend!

Today’s post is another DIY and a reallyyyy easy DIY at that. Ombré is a HUGE trend going on right now. Not only Ombré hair but also Ombré clothing and nails. Today I tackled Ombré dyeing a t-shirt. Mine didn’t turn out as gradient as I had hoped (I blame my dark color choice and leaving it in the dye too long) but it stills looks good.

What you’ll need for this project:

1) White t-shirt (or other clothing article)
*pre-wash before dyeing
2) RIT liquid dye (can be found at Michael’s)
3) 1/2 cup of salt
4) Bucket (choose one you don’t mind staining)
5) Hot water
6) Gloves (optional)
7) Something to stir the dye with (I chose a ruler that I didn’t care about staining)
8) Two clothes pins
9) Safety pins or straight pins (I forgot to photograph this… whoops)

Step 1

Fill your bucket with steaming hot water (around 3 gallons).

Step 2

Wet the shirt. (the shirt you’re planning to dye, not the one you are wearing…) Ring out until the shirt is damp but no longer dripping.

Step 3

Pin up the sleeves with safety pins or straight pins (if you wish to leave them uncolored).

Step 4

Add 1/2 bottle of RIT liquid dye to the steaming water and stir until combined.

Step 5

Add 1/2 cup of salt to the dye bath. Stir until combined.
(you may need to omit this step based on type of fabric being used… refer to side of dye bottle)

Step 6

Place shirt in dye bath up to the point where you’d like to start the Ombré effect and fasten onto bucket with clothespins to hold in place. At 5 minutes intervals (could be less depending on how light you’d like the Ombré to be) move shirt slightly out of dye and re-pin. I did this 4 times; leaving the last section in for 10 minutes instead of 5 for a darker tint.

Step 7

Un-pin shirt from the bucket and using your gloves remove from the dye bath. Rinse shirt until the water runs (mostly) clear. Unfortunately this step will take around 10-15 minutes and there still will be dye left in the shirt but as long as most is out you’re good!

Step 8

Un-pin the sleeves and hang outside to dry.

Step 9

Once dried you can wash the shirt. I did this in my kitchen sink. I ended up having to wash the shirt 3 times (once with laundry detergent and twice in a vinegar and water bath) in order to get the rest of the dye out. This process tinted the white part of my shirt slightly blue… which I actually think made it look better! After washing hang back out to dry again. I left mine outside until it was mostly dry and then threw it in the dryer with some towels to finish.

Step 10

Wear it!

(It was getting dark when I took this picture so you can’t really see the Ombré effect. You can see the gradient better in the picture on the left.)

I know this seems like a lot of steps but I promise you this is sooooo easy and you will love it! My mom wants me to make her one so I’m going to experiment with the timing and see if I can get a better Ombré on hers. I’ll post a picture once I make her shirt and let you know how it goes!

Give my tutorial a try? Leave a comment. I’d love to hear whether or not it worked out for you.

Have a great weekend!

– Katie

6 Comments

Filed under DIY and Crafts

DIY Are You Happy? Chart (Step-By-Step Instructions)

I have been promising a craft since I started this blog two weeks ago and this morning I finally got around to it while procrastinating on studying for chemistry, whoops…

For my first DIY I decided to re-create the “Are You Happy?” chart.

Original:

Mine:

To re-create this you’ll need the following:

– Frame (size is your choice,
I used an old 12 x 12 I had laying around)

– Background paper

– Circle and arrow templates (I made mine)

– Glue, tape, double stick tape or
Herma crafting tape in repositionable
(which is what I used, can be found at Michael’s)

– Scissors

Step 1

Cut out all circles and arrows. (If you’d like to re-create this using the templates I made leave your e-mail address in a comment at the end of this post and I can send them to you)

Step 2

Cut background paper to fit into your frame (I didn’t need to cut mine since I used scrapbook paper which is already 12 x 12 like my frame). Next, without using tape, start playing around with placement of the circles and arrows on your background paper. I tried two different layouts and found I liked the second layout the best so that’s what I went with.

Step 3

Once you’ve got positioning that you’re happy with you can start gluing or taping the circles and arrows.

Step 4

Once the circles and arrows are glued or taped they can be set into place on the background paper.

Step 5

Place finished product into frame.

As you can see you’re only 5 easy steps away from re-creating your very own “Are You Happy?” chart.

The last step would be to hang it up for display in your home.

I hope you all will give it a try. Leave a comment below if you have any questions.

– Katie

Give my tutorial a try? Leave a comment. I’d love to hear whether or not it worked out for you.

Leave a comment

Filed under DIY and Crafts